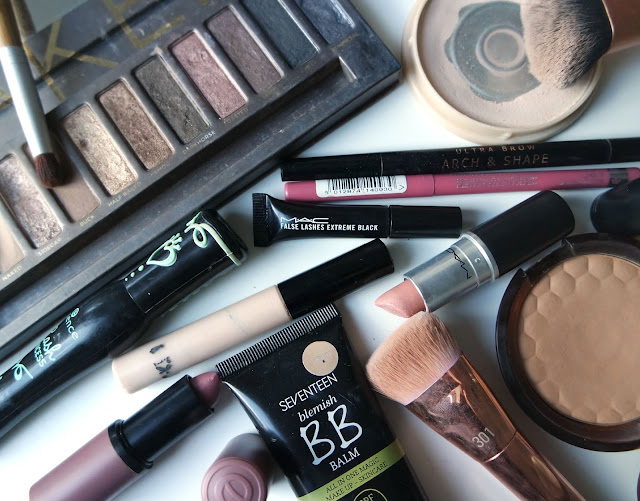
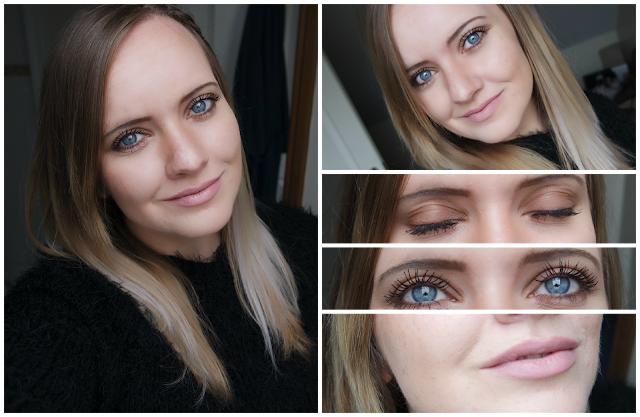
hey everyone! So as you can probably tell by the title and the pictures i'm back with another one of my look posts. This time i've decided to call it my current go to makeup look only because recently I have been drawn to this look a lot as it's nice and easy and I like it (for now). Usually I don't stick to a set makeup look or when I do stick to the same products it's because i'm at uni (so foundation, mascara and eyebrows, oh and lip balm). Also want to note that I have decided to include a step by step this time to be a little bit different...
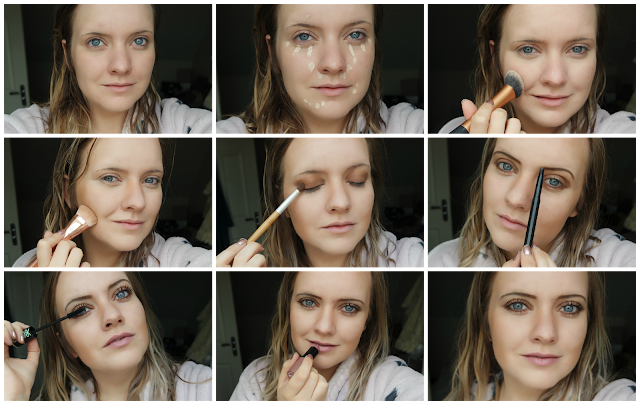
So from left to right:
Step 1 (top left): Base! Right so just after moisturising I will put on my base product which has been the seventeen BB balm recently. I love this stuff it gives me just the amount of coverage I want. I'm not going to rant about this or say anything else because i've spoke about it in my August favourites and it's got it's own post.
Step 2: Conceal! Now apologies for the most unflattering ugly picture ever where my eyes just look weird. Anyhow I next apply my concealer (long lasting concealer from collection) I put it under my eyes in a triangle like way. As well on any blemishes that need the extra hiding.. which I have a few of at the moment.
Step 2: Conceal! Now apologies for the most unflattering ugly picture ever where my eyes just look weird. Anyhow I next apply my concealer (long lasting concealer from collection) I put it under my eyes in a triangle like way. As well on any blemishes that need the extra hiding.. which I have a few of at the moment.
Step 3: Powder! This is when I decide to put my stay matte powder on just to set the makeup in place and give me a matte finish.
Step 4: Cheeks! This is bronzer time for me and I used my all time fave bronzer from The Body Shop and I just put it under my cheek bones, down the sides of my nose and around my forehead. Also side note I did blend it out more so It was more subtle as in the first pictures.
Step 4: Cheeks! This is bronzer time for me and I used my all time fave bronzer from The Body Shop and I just put it under my cheek bones, down the sides of my nose and around my forehead. Also side note I did blend it out more so It was more subtle as in the first pictures.
Step 5: Eyeshadow! Now that my face is done I move onto my eyes.. I don't know why but recently I have been loving wear a brown shade all over my lid.. this time I used buck from the naked palette. I place it all over my lid and just under my bottom waterline.
Step 6: Brows! Moving on to my eyebrows and oh my gosh I have a new found love which is the brow dual ultra brow arch and shape from Makeup Revolution. Honestly have been loving this to do my eyebrows with.. likelihood is that it will have it's own review soon.
Step 7: Lashes! Lately I have been loving using Essence Princess false lash effect mascara because I love how black it makes my lashes especially against the brown eyeshadow.. I think my lashes just pop more. For my lower lashes though I use my sample of MAC false lashes extreme black only because the essence one can cause clumpiness, find more about it here.
Step 8: Lips! For my lips I have actually used different products from the first set of pictures for the look to what I used in my step by step pictures. For my step by step I used Essence nude lipstick in 03 come naturally. However later on I changed my mind and decided to use MAC fleshpot and then used my lip pencil from Rimmel in eastend snob on top which I know is the wrong way but that's what I felt like today.
Step 8: Lips! For my lips I have actually used different products from the first set of pictures for the look to what I used in my step by step pictures. For my step by step I used Essence nude lipstick in 03 come naturally. However later on I changed my mind and decided to use MAC fleshpot and then used my lip pencil from Rimmel in eastend snob on top which I know is the wrong way but that's what I felt like today.
Step 9: Final Look! Just thought I would mention that the lighting in both photos differs and my actual final look is much more similar to the first set of pictures. Whereas the step-by-step image may look like my skins a tad bit darker/yellower than I am.
So that's everything I use to create my current go to look! I hoped you enjoyed this post. Let me know what you think to the step by step and whether I should continue to do it...
see you soon, han xo
ps: find my previous makeup look post here FOTD #2


I love the lipstick you've used in this look! It's such a pretty pink shade, perfect for everyday x
ReplyDeleteBlushhx
I love your eye makeup! It makes your eyes look so blue!
ReplyDeleteDanielle's Beauty Blog
The make up is gorgeous! great post :) x
ReplyDeletehttp://msznev.blogspot.com.au
that shadow combo really makes your eyes stand out! You look lovely x
ReplyDeleteGeorgia | The Weekend Attic - Personal Style, Beauty and Lifestyle
Your eyelashes are AMAZING! I love these types of posts of yours, it's so helpful to see what products look like when they're on somebody... but I don't think I'd ever have the courage to post my face online! xx
ReplyDeleteLooking pretty! Great picks for go to makeup
ReplyDeletewww.elabellaworld.com
Loving the Mac Fleshpot lipstick, may have to try this out next time I'm at a Mac counter! x
ReplyDeleteAlbana Janjeva | Stylist | albanajanjeva.com
The Naked Palette is on my go to makeup as well!!
ReplyDeletexoxo
Brooke|LookBrooke
Hi thankss for sharing this
ReplyDeleteYou are looking gorgeous
ReplyDeleteyour lipstock shade so amazing i love your eyes this blure eyes attarce me so much human hair extensions price in pakistan
ReplyDeleteMakeup Setting Finishing Spray price in Pakistan